Windows Resources

Windows Resources.

 Here is the collection of important blogs and sites about windows vista tips and troubleshooting. And also few good blog related to electronics and technology which help the visitors. Interest of this resource page is to provide valuable and interesting stuff to the visitors.

IE7 Shortcut Keys and Tricks

Internet Explorer Shortcut Keys and tricks.

IE full form is internet explorer. It is a web browser

List of Internet Explorer Shortcut Keys. 

1) To launch an item in quick launch hit "Win+Item Number" e.g. if Internet Explorer is the third item in quick launch hit "Win+3" to launch it. 

2) To open a new tab in IE7 use "Ctrl+N".

3) To switch between tabs in IE7 use "Ctrl+Tab".

4) To close an active tab in IE7 use "Ctrl+W".

5) To open a hyperlink in new tab press and hold "Ctrl" while clicking on the hyperlink. OR Use the Middle mouse button. 

6) To Zoom in a page use "Ctrl + (plus)".

7) To Zoom out a page use "Ctrl - (minus)".

8) To view IE7 window in Full Screen mode use "F11".

9) The menu bar is not displayed in IE7 by default, to view the menu bar press "Alt". To permanently display the menu-bar right click on the empty space between tabs and toolbar and then select "Menu Bar."

10) Windows Live search is the Default search engine for IE7 to add additional search engines and to change the default search engine, click the drop-down type arrow in the search box and select "Find More Providers" or "Change Search Defaults.

Windows Vista vs XP Comparision

Windows Vista vs XP Features Comparison.

Advantage of Windows over XP.

There are plenty of reasons to leave Windows XP and install Windows Vista and below are my top 15 favorites reasons to switch to windows vista.  

1. It’s the Interface, Stupid.

Perhaps the best thing about Windows Vista is the most obvious: its new interface.  

2. Flip Over Windows Flip 3D. 

Switching between open windows using Alt-Tab in previous versions of Windows was always a shot in the dark, as you never quite knew to which window you’d switch, or even which ones were open.  

3. Live Thumbnails.

Do you run a lot of programs and visit a lot of Web sites simultaneously? If so, you’ll appreciate Live Thumbnails. Hover your mouse over any window on the Taskbar, and a thumbnail of the window pops up, with the program and document name, or the Web site name, just above it. Now this one is really awesome point to be considered.

4. Boost Performance.

With ReadyBoost Windows Vista includes a quick way to enhance system performance: ReadyBoost. It preloads files and programs you often use into RAM so that they’re there when you want them, and you don’t have to wait for them to load from the hard disk. You can buy an inexpensive USB flash drive and use up to 4GB of cheap RAM to boost your system performance.  

5. Cool Performance Tools.

 If you’re the kind of person who tends to peek under the hood and tinker, you’ll find a lot to like in Windows Vista, which contains plenty of applets and utilities.  

6. Better Security.

At every level of Windows Vista, you’ll find improved security. The firewall is now two-way, including inbound as well as outbound protection.  

7. Find Anything Fast With Search.

Can’t remember where you put an important file? It’s no longer a problem. Windows Vista integrates a new search technology throughout the operating system–on the Start menu, within Windows Explorer, and just about everywhere else you look.  

8. Nifty Software Gadgets.

If you’re a software gadget fan, you’ll love Windows Vista.  

9. Better Wireless Networking.

Anyone who uses a wireless network at home, at work, or on the road will appreciate the way Windows Vista handles wireless networking.  

10. Map Your Network  

Want to see every single computer and device connected to your network–and get instant information about each, such as their IP addresses?  

11. Better Graphics With Windows Photo Gallery.

12. Become a Director With Windows Movie Maker.

 Windows Vista comes with a new version of the much-maligned movie making tool Windows Movie Maker, and it’s a big surprise–you’ll actually want to use it.  

13. Better Notebook Support.

In previous versions of Windows, the mobile-computing features seemed bolted on after the fact.  

14. File Sharing and Syncing.

With Windows XP it was possible to share files among PCs on your network–possible but often impossibly hard, it seemed.  

15. Protect Your Kids With Parental Controls.

 Worried that your children may be exposed to inappropriate content online? Want to make sure they’re not playing violent games? Parental Controls put you in the driver seat. Not only can you determine the kinds of sites they visit and games they play, but you can also enforce rules about when they’ll be able to use the computer at all. 

Clean Install Windows Operating System

Clean Install Windows Vista With Upgrade DVDs.

  Clean Install Windows Vista With Upgrade Traditionally, you are required to have a previous installation of Windows before you can upgrade, e.g. have Windows XP on your system before using Windows Vista Upgrade DVDs. What if you have ALREADY upgraded to Windows Vista but are having system issues that require formatting and re-installing Windows? Paul Thurrot proposed this hack that lets you install a Windows Vista Upgrade, without needing to re-install Windows XP first. This is good for windows troubleshooting and fixing system related problem on Windows OS.

Steps to Clean Install Windows Operating system.

1) Boot from the Windows Upgrade DVD and begin the setup Windows OS program. 

2) When prompted to enter Windows product key, DO NOT enter it. Click "Next" and proceed with setup - this will install Windows as a 30-day trial. 

3) When prompted, select the edition of Windows which you have purchased and continue with the setup. 

4) Once setup has been completed and you have been brought to the desktop for the first time, run the install program from within Windows Vista. 

5) This time, type in MS Windows product key when prompted. 

6) When asked whether to perform an Upgrade or Custom (advanced) install, choose Custom (advanced) to perform a clean install of Windows OS.(Yes! This means that you will have to install Windows for a second time) . 

7) Once setup has completed for the second time, you should be able to activate Windows Vista normally. You can also delete the Windows old directory which contains information from the first Windows Vista installation. 

This means that all Windows upgrade DVDs can be used as full retail DVDs. However, this is an illegal approach and you are going against Windows Vista's EULA, you install an upgrade without owning a previous version of Windows as specified by Microsoft. EULA full form is End User License Agreement.

Improve SATA Disk Performance in WINDOWS

Increase SATA Disk Drive Performance in Microsoft Windows. 

  SATA is equipped with dell and Microsoft windows system. You can add SATA hard disk with windows, MAC, Linux and novel operating system. SATA full form is Serial Advanced Technology Attachment. This will improve windows performance and your computer become faster.

How to enable hard disk write caching.

You can squeeze a more performance out of SATA hard disk drive by enabling write caching. The price though, is an increased risk for data loss/corruption. should you experienced a power loss - this risk is less in a laptop because of its battery. Hard disk write caching speed up windows computer and it will increase PC performance.

1. Click on the Start Button. 

2. Type "Device Manager" and hit Enter. 

3. Expand Disk Drives. 

4. Right-click on hard disk drive and select Properties. 

5. On the Policies tab, check Enable Advanced Performance. 

6. Click OK and close Device Manager.

SATA provide more better performance compare to normal hard disk. You can speed up windows operating system and improve computer performance.

Windows Vista reviews effect windows XP.

Microsoft windows vista effect on windows XP. 

Tools works with Windows 95, Windows 98, Windows Me, Windows 2000 and Windows XP.  

Great tutorial to give ur Xp ..the VISTA look.

Tool to give 3D flip show in XP. 

 Visual Tool tip makes it possible to show a thumbnail of a window by putting the mouse cursor over a button of the task-bar.

Vista Start Menu ,SE Desktop Sidebar ,Folder Marker ,Copernic Desktop Search, JetStart Free ,Visual Task Tips ,FastFolder, LaunchBar Commander ,Google Desktop, WindowBlinds

 Vista glass look to ur XP

Animations in desktop.................................

Disadvantage of Animation effect: 

It will slow down the computer.

Disable Windows Balloon Tips

Disable Enable Windows Balloon Tips.

 Most of us facing problem about balloon tips in windows operating system. This is the irritating thing in windows PC. Everyone want windows tips to disable balloon tips. As Windows balloon tips does not have any useful information. I disable that tips from the first day when I was using windows system and now in upcoming windows, I also disable it. Here is a tips how to disable balloon tips in windows. 

 Steps to Disable Windows Balloon Notification Tips.

1) Click start and go to run command prompt. 

2) Type GPEDIT.MSC (this is used to open group policy) and press enter. Now open User configuration, then Administrative template after that start Menu and finally Task bar. GPEDIT full form is Group Policy EDITor.

3) Choose remove balloon tips, right click with mouse and open properties. 

4) Now in option enable it and click OK. Close the GPEDIT and reboot Windows system. 

Congratulation you have disable your awful balloon tips in windows PC.  

How to change windows group policy using registry editor REGEDIT.

Gpedit.msc is not available in windows home and premium edition’s not to worry. we can do the same from registry in windows home and premium edition. 

1. Again go to run (windows key + R) and type REGEDIT and press enter. REGEDIT full form is REGistry EDITor.

2. Expand registry to HKEY_CURRENT_USER >> SOFTWARE > Microsoft>> Windows > Current Version>> Explorer > Advanced. 

3.Right click and create new DWORD value and give name as EnableBalloonTips. 

4. Give value as 0(zero).

Reboot your Windows PC and your work is done. For more windows tips and troubleshooting bookmark this website.

Windows Guide for File Sharing

Microsoft windows guide for file sharing and how to do Network file sharing.

 Microsoft windows is mostly used in network. so sharing of file and folder is very important here is windows guide for file sharing. You can do network file sharing between windows, MAC and Linux computer.

File sharing with windows is handled differently too. It stops users accessing a shared folder unless there are accounts established for each user. 

Tutorial for Windows File sharing on Network computer.

1) To share files from windows on a network, computer need to be connected with windows network. Now click the Network button and open the Sharing Center. 

2) Turn On Sharing and now you are able to use Public folder to share. You can also set permission for other user to allow access for modify or change the files. One more option is available to turn off password protection for public folder. 

Windows File sharing problem troubleshooting.

One more problem for networking between windows vista and windows xp is - Windows Vista uses a new protocol named Link Layer Topology Discovery (LLTD) to display computers in a network. LLTD full form is Link Layer Topology Discovery. But this protocol is not in windows xp or other windows operating system like windows 98. But for this Microsoft has release software for windows xp which must be installed on windows xp to show up vista machine on network. You can download this software for Microsoft download.

How to Do Networking Windows Computer

How to configure Networking between windows computer and change network name.

Windows  introduce many operating system. Windows 11 is latest version of windows and windows 10 network is already established. Few vista network problems like vista not recognizing xp on home network. Or may be you installed new Microsoft vista and want to add Microsoft vista to xp network or looking for help how to connect vista on network with xp.  

how to connect or network windows vista and windows xp. 

Steps to configure Windows network.

1.  In windows vista network setting menu is in the start bar by default and easily available for simple user and easy to configure. 

2. In the start bar find Network option. 

3. Select “Networking and Sharing Center”.

Here you can configure network, manage settings for windows network, add Computers to Your Network and Repair Connections. This is simple compare to windows xp. You can use these option for windows network troubleshooting and you can fix many windows network related problem.

Networking between XP and Vista.

Many time windows vista and windows xp in a same network but both machine are not able to see each other. Main reason is windows vista automatically takes name of network as “WORKGROUP” and in windows xp default network name is “MSHOME”. If you make sure that both computer have same network name. 

How to change network name in windows OS.

1. You can change the network name in windows xp by right click on my computer.

2. Choose property.

3. Select computer name option.

4. Then at the bottom network workgroup name, give the name what ever you like.

5.Apply and OK.

You need to restart your windows xp system to apply changes. 

To change network name in windows vista.

 Right click on my computer and then property Systems many, select change setting 

It will pop up computer name, change network workgroup name. 

And apply and OK. This can fix many network related problems like computer does not appear in network, computer not able to find network or can not see network computer.

Windows Network Troubleshooting

Windows network troubleshooting Tutorial.

Fix connected to Unidentified Network.

 Windows can sometimes cause network adapters to show up as connected to an "Unidentified Network", sometimes limiting the network to local access only.

Windows Network Troubleshooting 

There are many reasons that can cause Unidentified Network problem in Windows computer, but some suggested solutions to try are: 

Steps to repair Windows Network Problem.

• Reset Router using the web control panel.

• Update network adapter drivers. 

• Temporary disable any Anti-Virus/Firewall package to see if the problem is resolved. 

• Try assigning a static IP address to the network card. 

• Disable IPv6 on old network cards / routers. 

These suggestions may help you to narrow down the cause of the "unidentified network" problem.
Troubleshooting computer network is among the most important job descriptions of the network administrators, system administrators, network technicians and the IT consultants. A computer network can have different kinds of problems such as it can be infected with virus and spyware, attacked by hackers, accessed by unauthorized users and may face connectivity failure issues due to the faulty network devices or configurations.

Following is a list of the basic network troubleshooting commands that are built-in the Windows based operating systems and UNIX etc. The right use of these troubleshooting commands can helps a lot in diagnosing and resolving the issues with windows computer network. few more windows Windows tips.

List of Command used for computer network troubleshooting in windows, Unix, Linux and Macintosh.

1) PING command.

PING full form is Packet INternet Gopher or Packet INter-network Gopher.

Ping is the most important network troubleshooting command and it checks the connectivity with the other computers. For example your system’s IP address is 10.10.10.10 and your network servers’ IP address is 10.10.10.1 and you can check the connectivity with the server by using the Ping command in following format.
At DOS prompt type Ping 10.10.10.1 and press enter.
If you get the reply from the server then the connectivity is OK and if you get the error message like this “Request time out” this means the there is some problem in the connectivity with the server.


2) IPCONFIG command for network repair.

IPCONFIG full form is Internet Protocol CONFIGuration.

IPconfig is another important network problem troubleshooting command in Windows, Unix and Linux. It shows the IP address of the computer and also it shows the DNS, DHCP, Gateway addresses of the network and subnet mask.
At DOS prompt type ipconfig and press enter to see the IP address of your computer.

At DOS prompt type inconfig/all and press enter to see the detailed information.DOS full form is Disk Operating System. DHCP full form is Dynamic Host Control Protocol.


3) NSLOOKUP command to fix Network related problem.

NSLOOKUP full form is Name Server LOOKUP.

NSLOOKUP is a TCP/IP based command and it checks domain name aliases, DNS records, operating system information by sending query to the Internet Domain Name Servers. You can resolve the errors with the DNS of your network server. DNS full form is Domain Name Server.

4) HOSTNAME command for network repairs.

Hostname command shows you the computer name.
At DOS prompt type Hostname and press enter.

5) NETSTAT command for computer networking.

NETSTAT full form is NETwork STATastics.
NETSTAT utility shows the protocols statistics and the current established TCP/IP connections in the computer.

6) NBTSTAT for windows networking.

NBTSTAT full form is Net Bios TSTAT. It is used for net bios name resolution to fix network issue.

NBTSTAT helps to troubleshoot the NETBIOS name resolutions problems.

7) ARP command for networking.

ARP full form is Address Resolution Protocol.

ARP displays and modifies IP to Physical address translation table that is used by the ARP protocols.

8) FINGER command for network repair diagnosis.

Finger command is used to retrieve the information about a user on a network.

9) TRACERT command for networking.

TRACERT full form isTRACE RouTe.

Tracert command is used to determine the path of the remote system. This tool also provides the number of hops and the IP address of each hop. For example if you want to see that how many hops (routers) are involved to reach any URL and what’s the IP address of each hop then use the following command.
At command prompt type tracert www.yahoo.com or google.com. You will see a list of all the hops and their IP addresses.

10) TRACEROUTE command for network diagnosis.

Traceroute is a very useful network debugging command and it is used in locating the server that is slowing down the transmission on the internet and it also shows the route between the two systems.

11) ROUTE command for network routing table.

Route command allows you to make manual entries in the routing table.
Hopefully the above mentioned commands will help you to diagnose and troubleshooting computer networking problems.

Windows guide for Disk Utility

How to use disk utility in Windows for hard disk troubleshooting and repair.

  In windows operating system there is a disk utility which checks hard disk for error, bad sectors and recover information. You can troubleshoot hard disk in windows 11,10,8 computer. this is useful Windows guide to check hard disk. You can repair hard disk for bad sector, error and hard disk working slow. You can also use disk utility and de-fragmentation of hard disk for speed up hard disk performance in windows PC.

How to start Disk Utility features on Windows Computer.

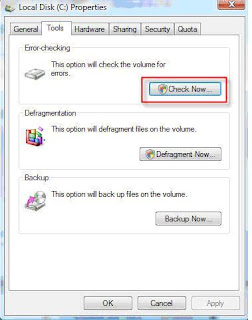
1) In order to check hard disk in Windows , go to my computer and select the drive you want to check , right-click on the disk and choose Properties as shown in below snap. windows disk utility 

2) On the Properties page, click the Tools tab and click Check Now. 

How to check and fix hard disk errors.

Check Hard disk for Error 

How to fix windows file system error and how to recover hard disk bad sectors.

 3) Select the options automatically fix file system error and Scan for and attempt recovery of bad sectors checkboxes and click Start. Fix Windows File System Errors 

4) You cannot check the disk while it is in use. Windows perform hard disk check when in restart by choosing Schedule disk check. Speed up hard disk perform in windows 

5) Upon restart, you will see following screen which indicate that hard disk is checked for errors and repaired if needed.

Hard disk troubleshootingYou can repair hard disk and troubleshoot hard disk error using disk utility. Same disk utility features available in Linux, Unix and Macintosh.
Create Windows Shutdown / Restart Shortcut Button

Windows guide to create shutdown and restart button Icon

 Here is Windows guide for creating shortcut for shutdown and restart your windows computer. In windows, you need few click to restart or turn off computer. Here is Windows guide to create shortcuts for shutdown restart. Below windows tutorial for shutdown shortcut will work on all windows OS including windows 11,10,8 and vista. It will not work on Unix, Linux and Macintosh. You can shutdown windows computer with single click.

Steps to create windows shutdown shortcut icon.

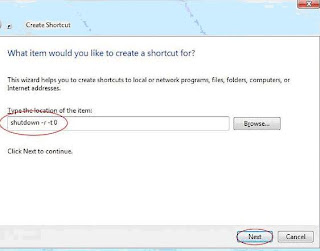
1) Right click on desktop and select short cut as shown in photo.

 Create windows shutdown shortcut 

 2) Now type in "shutdown -r -t 0" at shortcut path and click NEXT:

 Guide create windows shutdown shortcut 

3) Give the icon name “Windows Shutdown icon” and click Finish: 

Create Windows Restart shortcut 

4) Now you have Windows shutdown icon on your desktop.

Shutdown PC with single click 

How to create windows restart shortcut icon.

 To create shortcut for windows restart type, type this "shutdown -s -t 0" for short cut. hope you understand this windows guide for creating shortcuts for restart and windows shutdown.

Windows Tips for Printer Sharing

Windows Printer Sharing Tutorial and steps to add Network printer.

 There may be only one PC for group of computer. And you would like to share printer for entire office or may be you want to give temporary printer access for some Windows user. For this you have to do windows printer sharing. This Windows tips will guide you steps for printer sharing for windows workgroup. You can share windows printer with Linux, Unix and Macintosh computer and vis a versa.

 Steps for windows Printer sharing.

 1) To share a printer within a workgroup, enable printer sharing on the host PC (where printer cable connected). After enabling printer sharing, it allow other network PC to see the shared printer. Open the windows Control Panel by clicking on the Start Menu > Control Panel: Windows Printer Sharing Tutorial 

How to add and configure network Printer on windows.

2) Click View Network Status and Tasks:

 Steps to add Network printer 

How to enable printer sharing.

3) If printer sharing is disabled, click the button next to Printer Sharing, then Turn on Printer Sharing and click Apply:

 How to configure network Printer 

4) Printer sharing is now enabled on the windows host computer, allowing access to the connected printers. Go the PC where you want to share network printer,

5) Under control panel - go to network neighborhood and find the PC where printer is connected. Once you have found the shared printer you wish to use, right click on it and select Connect.

 How to enable printer sharing 

6) Sometime it asks for username and password from host computer to allow access for other computer. Enter username and password for windows. Now Windows install required driver and add access to the shared printer. This allow you to print from any application. This Windows tips for printer sharing work on workgroup base Network. Steps to add network printer are same as above.