Microsoft Windows Basic Troubleshooting Tips Guide.

Windows Basic Troubleshooting Tips.

Most of the below tips works for windows 11,10,8,7, vista and server all edition.
Windows Tips to enable Aero Cursors.

Windows Troubleshooting tips 1.

Microsoft windows operating system has included new aero cursors that is not turned on by default. To troubleshooting this in windows OS, Follow the steps below.
:Right click on desktop and select personalize. Click on the mouse cursors item to select a graphics different mouse cursor scheme. Change the scheme from none to Windows Aero.Click OK to see the new AERO mouse cursors.

Kill Security center notification problem in Windows OS.


 Windows Troubleshooting tips 2:
Windows security center remind you all the time about anti virus. New easy way to disable the security center messages. Click on the Security Center/Windows Security Alerts logo in the system tray. Click change the way Security Center alerts me. Select I do not want notification messages from Security Center.

Use small icons size tip for Windows.

Windows Troubleshooting Tips large icon.

The Windows icon size of the recently run programs list on the Start Menu is set to large by default. This is great if you like the large icons but it also cuts down on the number of recently run programs that can be displayed. Follow the steps below to give Start Menu a cleaner look.
windows Tips
 

disable large icons problem.

Right click on the start button and select properties.
Click on the customize button.
Scroll to the bottom of the list and remove the check from use large icons.
You can now also increase the number of recently run programs in windows OS that are displayed to something larger than 9.
Hit OK when you are finished.

Windows additional clock Configuration.

Windows Vista tips to add additional clocks to the system tray. Click the clock, and then click date and time settings. Click the additional clocks tab. You can add one or two additional clocks to the tray and select their time zones.
Here is more Windows Operating System Features.

Microsoft's word and notepad document more secure.

You can create XML documents, which are more secure than regular text files or even word processor docs. Just create a document in a word processor, print(not print out ) it via the options menu, and select the XPS printer. That's it You have secure document.

  Windows Home Basic Internet Explorer Problem.

If you’re annoyed by Internet Explorer’s incessant barking that you’ve lowered your security settings, launch “GPEDIT.MSC” from either the Run command or Start Search field, navigate through Local Computer Policy / Computer Configuration / Administrative Templates / Windows Vista Components / Internet Explorer. In the rightmost pane, double-click “Turn off the Security Settings Check feature” and set it to Enabled.GPEDIT full form is Group Policy EDITor Console.  .MSC full form is MicroSoft Configuration or MicroSoft management Console.


Windows Task manager for troubleshooting.

The Windows Task Manager gives you a lot more troubleshooting information in Vista.Click ctr+alt+del, Flip to the Processes tab, and in the View menu, click select columns and add description, command line, and Image path name. Moreover, when you right-click a process, you can select either go to service(s) or open file location. These are all long overdue options.

Displaying Run command on the windows Desktop.

You can create a shortcut for the Run command on desktop. From the start menu, go to all programs / accessories, drag a shortcut for Run to the desktop. Vista displaying Run on the start menu by default, Run is not shown when you open the start menu.To enable this:Right click on the task-bar, select properties click on the start menu tab. Click on the customize button scroll down and check Run (it's about 2/3's of the way towards the bottom.
Fix Windows problems

Windows Tips to allow Network access without password. 

In windows vista you can access computer locally without password. But it does not permit to access other network computer to access it without password. But you can change this default setting.
Go to run and type there “GPEDIT.MSC”.
It will open group policy. Now go to computer configuration- OS setting- security setting.
-Local policies(here you can set many local policy as per security demands).-security options.
Now you need to find and disable following options.

Double click on accounts: limit local account use of blank password to console login only.

There are lots of debate about Windows Hardware Requirements for hardware.
Windows vista tips to add Internet Explore7 Icon on desktop. In windows vista you can not find IE7 icon on desktop by default.

Add Internet Explorer shortcut to Windows Desktop.

But you can add it by registry editing.
Take back up of registry before making any changes.
Go to run and type REGEDIT.
And expand to Hkey-current user> software >Microsoft> windows > current version> explorer>HideDesktopIcons>NewStartPanel. And give value” {871C5380-42A0-1069-A2EA-08002B30309D}"=dword:00000000. If you can not find HideDesktopIcons. Then create new dword and give value as above.
Now close REGEDIT and restart the computer. REGEDIT full form is REGistry EDITor.

Microsoft Windows Tips for Resizing hard disk Partitions.

Before windows vista each Microsoft operating system require third party software to resize partition like c: or d:/. But windows vista has inbuilt features to resize windows partition.
Select my computer and right click it.
Clicks on manage option and then select Disk Management.
  Select partition on which you want to make changes like increase the size of partition or decrease the size of partition.
Note: this will not delete data on hard disk partition. But it is good if you take back up before doing such changes.

Access Denied error in windows computer.

When you trying to access some windows folder like document and setting, you may get error message that “access denied”. you need to change ownership of this folder. So open properties by right click on it. In security button select advance tab and click edit button. Now change ownership to your account by highlighting your account. Also select replace ownership to sub containers and apply changes.
comment: further tips for Microsoft windows will available in future.

Install Windows 11 without TPM 2.0 Chip Processor

Stratagem to install windows 11 no TPM 2.0 Processor on unsupported computer.

Technique 1) windows 11 Installation without TPM 2.0 Security Chip Processor.

You want to install Windows 11 without TPM 2.0 Chip Processor, Secure boot and 4 GB RAM. TPM full form is Trusted Platform Module. When you try to install Windows 11 on unsupported PC. You got error ‘This PC doesn't meet minimum system require to install this version of windows’ or “This PC Doesn't Currently Meet Windows 11 System Requirements to run windows 11 warning”.

Steps to Clean install windows 11 no TPM 2.0 Chip Processor.

1) You need to disable or bypass TPM check during windows 11 Clean installation right now. First look under BIOS /UEFI to enable TPM / FTPM. FTPM firmware based TPM, is used in Intel PTT Intel Platform Trust Technology and AMD Platform Security Processor.

If System does not have TPM processor, still you can upgrade Windows 11 on unsupported PC without TPM 2.0 Security Chip Processor.

2) Use REGEDIT to bypass TPM check on not supported computer for Windows 11 upgrade installation.

3) Type Regedit. REGEDIT full form is REGistry EDITor.

Browser Computer\HKEY_LOCAL_MACHINE\SYSTEM\Setup\. Add new key under setup. Name that key as LabConfig. This is used to test not supported devices Laboratory testing of windows 11.

Install Windows 11 without TPM 2.0 Chip Processor


Computer\HKEY_LOCAL_MACHINE\SYSTEM\Setup\LabConfig.

4)Add new DWORD(32-bit) value key to LABCONFIG as shown in the image.Name that key as BypassTPMCheck.

Bypass TPM Check

You can give 0 or 1 value in Hexadecimal. Registry Value data 1 enable features And Value data 0 Disable Features. Give value 1 as we turn on to skip bypass TPM 2.0 Security Chip Processor Check during Clean Windows 11 installation on unsupportedPC. Save changes to registry and restart computer.

5) Follow Windows11 Clean Installation steps or Upgrade To Windows 11 Right now tutorial. You can easily install windows 11 without TPM.

6) If You want to install windows on another system. Then export  LabConfig registry File. You can install windows 11 using USB Bootable pen drive or DVD. Copy LabConfig registry File to Bootable USB pen drive. You can access command prompt when windows is not installed using Shift plus F10 keys. Open notepad, browse and run labconfig registry file.

You can use this technique to install windows 11 without Secure boot,TPM Processor, 4 GB RAM and without Windows 11 Hardware requirement compatibility.

 Technique 2) Modify AppraiserRes.dll to install Windows 11 Without TPM Security processor.

AppraiserRes.dll is Appraiser Supplemental Resources File. DLL full form is Data Link Library. It is located under c:\Windows folder.

Modifing  AppraiserRes.dll file allow you to install windows 11 without 4 GB RAM,TPM 2.0 Chip Processor and Secure boot.

Many security features will not work without TPM 2.0 security processor. System can not use Measured Boot, secureBIO, device encryption, remote lock on devices. TPM platform Crypto provider key storage.

Download Windows 11

Download Windows 11 ISO Disk Image for Installation and Upgrade.

Method 1) Download windows 11 from Microsoft. Go to Microsoft software download page.

Select windows 11 for download.


Six different ways to download Windows 11

Method 2) Use Windows 11 Installation Assistant to download Windows 11.

Download Windows 11 Installation Assistant. Install on computer and run it. It will download windows 11 and also install it. This is easiest method to upgrade and install windows 11. This Windows 11 Installation Assistant tool only work for windows 10 2004 and higher version.

 Method 3) Download Media Creation Tool to install and download MS Windows 11.

1) First download windows 11 Media creation Tool from Microsoft.

2) Install windows Media Creation Tool on PC.

3) Run application and select language, 64 Bit architecture.

  At present there are heavy traffic, it may takes few minutes to download windows 11.

Select Media, You get two options.

 1) USB Pen drive.

It will create Bootable USB pen drive for windows 11 Installation.

 2) ISO files.

It will Download WINDOWS 11 ISO file to computer. You can Burn Create bootable DVD for windows 11 Installation.

Method 4) Download Windows 11 Disk Image ISO to Create Windows 11 Bootable Pen drive or DVD.

Download windows 11 disk image ISO from Microsoft site as shown in image. Use same web page you have used to download Media Creation Tool for windows.


Download Windows 11 Disk Image ISO

Follow Clean installation windows 11 steps or follow steps for Upgrade to windows 11 from windows 10 right now.

Method 4) Use Microsoft Volume licensing service center for download.

Method 5) Use Visual Studio subscription site. Log in with your account. You can find download link.

Method 6) Use Windows Insider Preview Download site. You need membership for that.

How to Install Windows 11 No Data Loss

Windows 11 Installation using Windows 11 Installation Assistant.

This is Easiest method to Install windows 11 No data loss or format hard disk. This Windows 11 Installation tutorial for Stable version of 11.

Download windows 11 installation assistant.

There are 3 steps downloading, installing and configuration of WIN 11.

Step 1) Download Windows 11 using internet connection.

Step 2) Your PC need to restart to install windows 11. Select Restart Option.

System will reboot and it will restart many times during windows 11 installation.

This might take few minutes, Do not turn off your PC.

Step 3) After successful installation of Windows 11, It will ask for passcode. Enter System password.

Before Installation, Use Microsoft PC Health apps to Check Whether your PC meet Windows 11 System Requirement.

Run PC Health apps.

Lets check if This PC meets Windows 11 System Requirements. Click on check now.

If you get message on screen This PC meets Windows 11 requirement.

You can now Install Windows 11 on computer.

Install Windows 11 without Secure Boot

How to install Windows 11 Without Secure Boot and without recommended system requirement.

To install windows 11 right now, your computer must have minimum System Requirement for Windows 11. Below method allow you to run windows 11 on system which does not have secure boot. You can use this technique to install windows 11 without Secure Boot 4, GB RAM, TPM 2.0 and without necessary hardware requirement.

Stratagem to bypass Secure Boot check for windows 11 installation.

When you try to install windows 11 without recommended system requirement. You got error ‘This PC doesn't meet minimum system require to install this version of windows’ or “This PC Doesn't Currently Meet Windows 11 System Requirements to run windows 11 warning”.

Steps to Install Windows 11 without Secure Boot.

1) Use REGEDIT to bypass Secure Boot check on not supported devices to install Windows 11 right now.

3) Type Regedit. REGEDIT full form is REGistry EDITor.

Browser Computer\HKEY_LOCAL_MACHINE\SYSTEM\Setup\. Add new key under setup. Name that key as LabConfig. This is used to test not supported devices in Laboratory testing for windows 11 compatibility.

Computer\HKEY_LOCAL_MACHINE\SYSTEM\Setup\LabConfig.

Install Windows 11 without Secure Boot

4) Add new DWORD(32-bit) value key to LABCONFIG as shown in the image. Name it as BypassSecureBootCheck.

Give value 1 as we turn on to skip bypass Secure Boot check during windows 11 installation on not supported devices. Save changes to registry and restart computer.

5) Follow windows11 Clean Installation steps or Upgrade To Windows 11 Right now tutorial. You can easily Install windows 11 without 4 GB RAM, Secure Boot, TPM and without recommended system hardware.

Note: PC may not work properly. It may automatic restart shutdown hand or blue screen problem.

Enable Secure Boot on your system.

1. Type MSINFO32 at run command prompt. It provides system information. Check Secure boot is ON or off.

Bypass Secure Boot Check

To turn on Secure boot Go to setting/ update and security / recovery / advance startup -restart now.

Use same method to Install Windows 11 no TPM 2.0 Chip processor.

Install windows 11 without 4 GB RAM

Upgrade Install Windows 11 without 4 GB RAM on unsupported PC no recommended system requirements.

 To install windows 11 right now, your computer must have at least 4GB RAM. RAM full form is Random Access Memory. Below method allow you to run windows 11 on system which do not have 4GB RAM. Stratagem is to bypass 4GB RAM check during windows 11 installation. You can use this technique to install windows 11 without 4 GB RAM, TPM 2.0, Secure boot and without recommended system requirement.

 Technique to install Windows 11 without 4 GB RAM.

When you try to Install Windows 11 on Unsupported PC without Device specification. You got error ‘This PC doesn't meet minimum system require to install this version of windows’ or “This PC Doesn't Currently Meet Windows 11 System Requirements to run windows 11 warning”. 4 GB RAM Windows 11 fix is possible.

Steps for windows 11 installation Bypass 4 GB RAM PC hardware.

1) Use REGEDIT to bypass RAM check on not supported devices to install Windows 11 right now. Use this method to Install Windows 11without TPM 2.0 and Secure Boot.

3) Type Regedit. REGEDIT full form is REGistry EDITor.

Browser Computer\HKEY_LOCAL_MACHINE\SYSTEM\Setup\. Add new key under setup. Name that key as LabConfig. This is used to test not supported devices Laboratory testing for windows 11.

Computer\HKEY_LOCAL_MACHINE\SYSTEM\Setup\LabConfig.

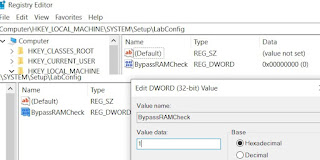
4) Add new DWORD(32-bit) value key to LABCONFIG as shown in the image. Give name to new value as BypassRAMCheck.

You can give 0 or 1 value in Hexadecimal. Registry Value data 1 enable features And Value data 0 Disable Features. Give value 1 as we turn on to skip bypass RAM check during windows 11 installation on not supported devices. Save changes to registry and restart computer.

Install windows 11 without 4 GB RAM


5) Follow Windows 11 Clean Installation steps or Upgrade To Windows 11 Right now tutorial. You can easily Install Windows 11 without Secure Boot, TPM 2.0 Chip, 4 GB RAM and without minimum hardware.

Note: PC may not work properly. It may automatic restart shutdown hang or blue screen problem.

Install Windows 11 on Unsupported PC

How to install windows 11 on unsupported PC Hardware without TPM, Secure Boot, 4 GB RAM bypass all hardware check.

It is possible to install windows 11 on unsupported PC which does not have minimum hardware requirement. Still you can run windows 11 without recommended hardware requirement. Stratagem is to bypass all hardware check for windows 11 installation including TPM, Secure Boot, 4 GB RAM.

 When you try to install windows 11 on unsupported hardware Laptop. You got error ‘This PC doesn't meet minimum system require to install this version of windows’ or “This PC Doesn't Currently Meet Windows 11 System Requirements to run windows 11 warning”.

 Procedure to bypass recommended hardware requirement for Windows 11 Installation.

This process allow you to Install Windows 11 without TPM, Secure Boot, 4 GB RAM, Device specification on non-supporting computer.

Steps to install windows 11 without minimum system requirement.

1) Type regedit at command prompt.

2) Browser Computer\HKEY_LOCAL_MACHINE\SYSTEM\Setup\. Add new key under setup. Name that key as LabConfig.

3) Use this web page procedure to bypass TPM, RAM Secure Boot check for windows 11. Install windows 11 without TPM 2.0, Install windows 11 without 4 GB RAM and Install windows 11 without Secure Boot.

You can bypass all hardware check for windows installation.

4) Alternatively create registry file. Open notepad,

Type below script,

Windows Registry Editor Version 5.00 [HKEY_LOCAL_MACHINE\SYSTEM\Setup\LabConfig]

“BypassTPMCheck”=dword:00000001

 “BypassRAMCheck” =dword:00000001

“BypassSecureBootCheck” =dword:00000001

Save this notepad file as windows11hardwarebypass.reg. And copy it to bootable USB /DVD or ISO Image file.

5) During Windows 11 installation access command prompt using Shift + F10 key. Open notepad, browse and execute windows11hardwarebypass.reg file. Then follow steps for install upgrade windows 11 no data loss.

Create Windows 11 Bootable USB Pen Drive

Make windows 11 Bootable USB Flash Drive and convert ISO Image to Bootable USB / DVD Media.

There are three methods to create Windows 11 bootable USB Pen drive Media. We will use windows bootable USB tool software to create windows bootable image creator.

First method) Download Media Creation Tool to Create Windows Bootable USB Pen drive.

1) Download windows 11 Media creation Tool from Microsoft.

2) Install windows Media Creation Tool on PC.

3) Run application and select language, 64 Bit architecture.

4) You get two options 1. USB flash drive 2)ISO file. Select USB flash drive. It will delete data on flash drive. Minimum 8 GB pen drive is needed.


Create Windows 11 Bootable USB

Second Method)

Use windows USB /DVD download tool to make Windows Bootable USB Flash drive.

 This converts ISO Image to bootable USB /DVD.

1. From Microsoft store, you can download this USB tool to Make windows 11 bootable DVD Media USB pen drive. This software tool can convert ISO Image to bootable USB.

2. Copy ISO image file to your system.

3. Open USB /DVD download tool and browse location of windows ISO image file.

4.  Select USB pen drive or DVD drive and click begin copy.

You have successfully covert ISO to bootable USB drive.

Third Method) Create Windows USB Bootable from ISO Image file.

1) Right click on ISO file. Click on Mount.

2) Format pen drive using windows OS. Create 1 GB FAT32 partition and other NTFS partition. Transfer ISO files and folder. Separately copy BOOT file to pen drive.

And copy DVD files to pen drive.

Make Windows 11 Bootable DVD

Make Windows 11 Bootable DVD Disk for installation and convert ISO file to Bootable DVD / USB Media.

 There are two techniques to create windows 11 bootable DVD disk. Use software to create bootable DVD from ISO image. You can also make bootable windows 11 DVD drive from USB bootable / ISO.

First technique) Use windows media creator tool to make DVD bootable windows 11 software.

1) Download windows 11 Media creation Tool to make bootable DVD from windows bootable ISO download.

2) Open the tool, accept agreement, choose language and windows 11 Edition.

3) You have two options choose 1. USB pen drive and 2. ISO file. Select ISO file to create windows bootable image creator.


Make Windows 11 Bootable DVD

4) Give path and file name to download windows bootable ISO image.  It starts Windows 11 Download.

5) Open DVD burner software. Give path of bootable ISO file for Windows.

6) Start bootable DVD burner software, when prompt insert blank DVD. It will create windows 11 bootable DVD drive.

Second technique )

Use windows USB /DVD download tool to make Windows Bootable DVD disk drive. 

This converts ISO Image to bootable dvd.

1. From Microsoft store, you can download this windows USB /DVD download tool to Make Windows11 Bootable USB / DVD software. This software tool can convert ISO Image to bootable DVD disk.

2. Copy ISO image file to your system.

3. Open USB /DVD download tool and browse location of windows ISO image file.

4. Select USB pen drive or DVD drive and click begin burning.

You have successfully covert ISO to bootable DVD drive.

Check PC Eligible for Windows 11 Install and Upgrade

Check whether your PC eligible for windows 11 and test PC support windows 11 install upgrade.

 To support windows 11 upgrade installation on your computer. Computer must have recommended system requirement for windows 11.

Minimum system hardware requirements for windows 11 is 1GHz processor, 4GB RAM, 64 GB hard disk, secure boot, UEFI system firmware, TPM 2.0, graphics card DirectX 12 or higher and 720 HD resolution. You can get in details Windows 11 System Requirements to run on this pc.

 Steps to check your PC support Windows 11 or not.

How to get your computer hardware configuration details.

Method 1) Use MSINFO32 command at run prompt. It provide information about processor, RAM, hard disk, BIOS mode UEFI, Secure boot state. From this you can confirm whether your PC can run windows 11 or not.

Method 2) Use Windows PC health Check App for how to check if I can run windows 11.

Download windows 11 PC health check setup to test eligibility for system.

Install on your computer.

Open PC Health check app. Click on check now. It will show result about whether your pc support windows 11 and eligible for windows 11 upgrade installation or not. It provides details about which hardware is lacking for windows 11 requirement. Though you can Install Windows 11 on Unsupported PC.

Check PC Eligible for Windows 11

Method 3) Use Windows 11 Installation Assistant for eligibility.

Download windows 11 installation assistant and install on your computer.

Run the software.


Check PC support windows 11

It will check computer hardware and show result about whether your system meet minimum system requirement to install windows 11 or not. It decides can I Install Windows 11 on This Computer or not. You can use Windows 11 Installation Assistant to Install Windows.

Windows 11 Clean Installation Guide

 How to Clean Install windows 11 using Bootable USB / DVD / ISO Image.

Windows 11 Clean installation on any PC has 3 main Section. Clean installation deletes all data on hard disk.

1) Download Windows 11.

2) Installation of Windows 11.

3) Setup of Windows 11.

You can do Windows 11 clean installation on unsupported PC without TPM, Secure Boot and 4 GB RAM.

 Steps for How to New fresh installation of Windows 11.

1) Download Windows 11 Setup or Create Windows 11 BootableUSB pen drive or Make Windows 11Bootable DVD ISO.

 2) Change BIOS or UEFI Setting for boot device preferences.

BIOS full form is Basic Input Output System. UEFI full form is Unified Extensible Firmware Interface. UEFI act as interpreter between firmware and operating system. Secure boot is one feature of UEFI.

 How to enter in UEFI/ BIOS setting.

Use function keys (F2,F5, F12) , DEL key, ESC key to enter BIOS/ UEFI.

Change Boot Device from IDE hard drive to USB Pen drive or DVD. IDE full form is Integrated Development Environment.

Use Up Down Arrow keys or PG UP, PG DN key to change boot device under BIOS. Press F10 to save UEFI changes. If you do not find boot device option under BIOS. Temporary Disable Secure Boot Option.

3) Boot PC with bootable media. Select language, keyboard type. Enter product key or activate windows 11 later. Go to setting/ Update and security / Activation.

There are two options 1.Upgrade or 2. Custom Installation.

For Clean installation of Windows 11 Select Custom installation. Upgrade option will upgrade to windows 11 from windows 10.

 4) Select partition for windows 11.

You will see list of partition. Partition Zero normally use as primary partition for Operating System Install. There are few partitions under partition 0. System partition, MSR partition etc. MSR Full form is Microsoft Reserve partition. Label is given by GPT. GPT full form is GUID Partition Table. GUID full form is Globally Unique Identifiers.

 Delete existing partition and select unallocated space to create new partition. It will create new partition table for Windows. Or select any existing partition 0.

5) Select Country, keyboard, network configuration, System name, setup windows 11.

Enter Microsoft account login email id and Create PIN.

You can restore file from OneDrive or Set up as new device.

Do privacy Setting, Customize system and configure OneDrive backup.

Windows 11 Hardware Requirement Check

Windows 11 system requirement guide and Check windows 11 hardware requirement eligibility.

If your PC meet below windows 11 requirement. You can upgrade to Windows 11 right now or you can clean install windows 11.

 1) Windows 11 Processor requirement.

Processor >= 1GHz, having 2 core and 64 bit processor.

SoC / System on Chip IC.

2) RAM requirement for Windows 11.

RAM >= 4 GB. In windows 10 almost 2.8 GB RAM is used by system. So I do not think that with 4 GB RAM you can get  even average performance of Windows 11.

3) Hard Drive Requirement for WIN 11.

HDD >= 64 GB.

4) System Firmware requirement for windows 11.

UEFI, Secure boot capable. Type msinfo32 at run command prompt. Check BIOS mode and secure boot state.

BIOS Mode = UEFI and secure boot state= ON.

5) TPM requirement for Windows 11.

TPM 2.0.

TPM full form is Trusted Platform Module. Security Processor Version 2.0 is need.

Go to setting/ update and security/ windows security / device security / security processor / security processor details. Specification version = 2.0.

6) Display graphics card.

Graphics card >= DirectX 12 or higher and WDDM Driver 2.0. WDDM full form is Windows Display Driver Module.

7) Display Screen.

HD 720 resolution, diagonal screen length > 9 Inch and 8 bits per color channel.

How to test windows 11 hardware requirement.

Compare your system hardware with above minimum hardware requirement for windows 11. You can check windows 11 hardware compatibility also.

 Above is minimum hardware requirement. You can Install Windows 11 on Unsupported Computer without TPM, Secure Boot and 4 GB RAM or without compatibility hardware. But windows 11 does not work smoothly, it hangs and give errors.

 Windows 11 Hardware requirement checker tools.

Upgrade WINDOWS 11 without losing data

Upgrade to WINDOWS 11 right now from Windows 10 without losing data.

Windows 10 user does not require windows 11 license key. It is free upgrade to windows 11 from 10. But your windows system has windows 8, 7 or any other windows OS. It requires to buy license for windows 11, then Upgrade to Windows 11 without TPM, Secure Boot and 4 GB RAM.

 Steps to free upgrade to windows 11.

1) Start windows 10 system. Click on Windows Start button/ Setting- control panel / Update and security/ Windows Insider Program. This is first steps for how to upgrade from windows 10 to windows 11 free.


Windows 11 Upgrade

2) System must have Minimum Hardware Requirements for Windows 11. Select upgrade to windows 11 option. Please take backup before upgrade to WIN 11. Though it will not delete data on operating system.

If Windows System is eligible to upgrade for Windows 11. You will get notification When you start computer. System does not meet windows 11 Requirements, it will give following message under Windows Insider Program option.

“Your PC DOES NOT MEET THE MINIMUM HARDWARE REQUIREMENTS RECOMMENDED FOR WINDOWS 11, and there may be issue and bugs that impact your experience.”

You can use following methods for how to upgrade windows 11 right now from windows 10.


Method 1) Create Windows 11 installation Media for Upgrade.

 You can Create Windows 11 bootable USB pen drive for installation or you can burn bootable DVD for installation. Select upgrade option during installation. It will install 11 without deleting data.

Method 2) Download Windows 11 Installation Assistant. Run the app,  Installation assistant tool will Download Windows 11 and install on your computer. Just follow on screen instruction.

Method 3) Download windows 11 Optical Disk image or ISO file. And do Windows 11 Clean Installation.